Table of Contents
Planning an Herb Garden Design
Cooks and gardeners have been growing herbs for thousands of years. People enjoy their bold flavors and tantalizing aromas. You can always go out and purchase bottled dried herbs at the grocery store. But there’s nothing like the taste of fresh herbs.
I love growing my own herbs because it puts them right outside my door. Just pop outside with some clean sheers, and snip, snip away. Sometimes, when you buy herbs, they go bad because you don’t use the stuff all at one time. But cultivating herbs in your garden means you can harvest as much… or as little… as you need.
Another cool thing about an herb garden is that you don’t need a large area to grow multiple types and varieties. You can grow them in containers, garden beds, raised beds, hanging pots or anywhere you have space.
6 Steps to Designing an Herb Garden
Use these six simple steps to help you design the perfect herbal garden for your needs, space and landscape:
1. Select the Right Location
There are two main reasons why people start herb gardens:
- As Companion Plants – In this case, plant your herbs in containers or raised beds near the other parts of your garden
- For Consumption – If you use a lot of herbs when cooking, juicing, making teas, etc…, plant your herbs right outside your back door.
For the best growing conditions, ensure the following exists:
- Well-draining soil
- Nutrient-rich soil
- Gets no less than six hours full sunlight each day
2. Decide on the Garden Size
Keep these factors in mind when determining the best size for your herbal garden:
- Quantity – How much do you intend to grow?
- Plant Sizes – What’s the expected width and height at maturity?
- Access – If the width or length of the bed is more than 4 feet, you probably won’t be able to reach the middle (I made that mistake in 2020).
3. Plan the Garden on Paper
Get a sheet of paper and a pencil with an eraser and draw a sketch of your garden. That way, you can literally visualize how things will look and fit into the space properly:
- Draw the shape of your garden bed
- Add 1-inch squares within the design
- Write the names of each herb within the squares
- Place taller herbs in the back so they don’t block sunlight from the smaller varieties
- Parsley, chives and other shade-lovers should be planted directly in front of your taller plants, which will give them shade
Note: Use this guide to help you understand more about companion planting herbs.
4. Choose a Garden Theme
This is not absolutely necessary. But it can be a lot of fun. Some herb garden theme ideas include:
- Herbal Tea Gardens – Chamomile, lemon balm, mints, hyssop, anise
- Italian Herb Gardens – Parsley, oregano, basil
- Culinary Herb Gardens – Chives, basil, parsley, thyme, rosemary, oregano
- Fragrant Herb Gardens – Scented geraniums, lemon balm, lavender
- All Basil Gardens – Purple, lemon, Genovese, sweet, lemon, lime, spicy
5. Make a Plan for Mints
Keep in mind that mints can be very invasive plants. They tend to spread very quickly and are known for taking over garden spaces. So, I advise planting mints in containers.
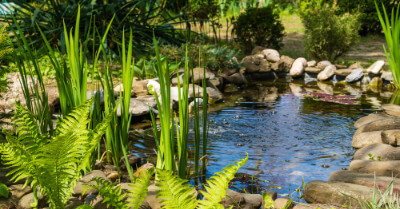
6. Design Your Border
Adding a border to your herb garden makes it much more pleasing to the eyes. It also makes it easier to maintain the plants, weeds, soil and water usage. Here are some ideas for garden borders:
- Rocks
- Wood chips
- Wooden boards
- Logs
- Patio pavers
- Bricks
- Fence
Garden Design Ideas for Growing Herbs
The style of your herb garden should be based on your needs, space and access. Let’s tackle a few of these issues in the herb garden designs below:
1. Low on Space
Don’t have enough space for an entire bed? Or you rent and are not allowed to have one? Then, why not set up a container garden?
There are two main advantages to growing herbs in containers:
- Each plant has its own space to grow in, allowing the roots to spread out as needed
- You can move each plant individually to different areas within the garden when needed
2. Companion Planting
Your herbal garden doesn’t have to be strictly for herbs. Try squeezing some veggie varieties in as well. This will help you grow those crops while using the herbs to ward off nasty bugs and other pests.
Here are some herb companion planting tips:
- Basil – Perfect plant to grow next to eggplants, peppers and tomatoes
- Catnip – Helps protect beans, beets, brussels sprouts, cucumbers, and squash
- Dill – Great companion plant for cabbage, cucumbers, kale, onions and lettuce
- Oregano – Plant next to cantaloupe, grapes and honeydew melons
- Sage – Companion plant with broccoli, brussels sprouts, cabbage, carrots, kale
- Thyme – Provides protection for cabbage, cauliflower, kale and tomatoes
3. Prefer a Flower Garden
If you like the idea of growing lots of flowers right outside your back door, you can still grow herbs there too. Intercrop them with your gorgeous flowers or simply reserve corners here and there for herbs.
This is perfect for raised beds. Just use the square-space planting method. Your flowers will attract ladybugs, butterflies and other beneficial insects. And the herbs will help deter the so-called bad bugs away from your flowers.
4. Don’t Like Touching Dirt
Most gardeners get offended when people refer to garden soil as dirt. But some feel it’s all the same and want no parts of touching it. If that’s you, why not look into a hydroponic herb garden.
What does hydroponic growing mean? In short, it’s a method of growing without using any soil. Plants are essentially grown in nutrient-rich water instead. Some of these systems also use sand, gravel, coco-fiber or some other sterile growing medium.
There are various types of hydroponic systems, including:
- Wicking Systems – Roots of plants get their water and nutrients through a wick of some sort, like a piece of felt or a rope
- Deep Water Culture or DWC – The actual roots of the plants are submerged in a reservoir filled with nutrient-rich water
- Nutrient Film Technique or NFT – Plants are grown in net pots near a large reservoir connected to an air stone and pump for oxygenation
- Ebb and Flow – The plants are housed in a tray connected to a pump and timer which floods the plants with nutrients and water based on a timed cycle
- Aeroponics – Plant roots get water and nutrients through mister that provide fine sprays over them while they’re suspended in the air
- Drip Systems – Nutrients and water are continuously pumped through a channel and back into the reservoir over and over as the plants are suspended in the air in net pots
5. No Ground Space at All
Maybe you live in an apartment or you simply don’t have space on the ground, not even for containers. In that case, grow your herbs on the wall.
Many people like to use terra cotta containers to give their wall gardens a rustic look. However, you can use just about any type of pot you like, as long as you hang it in a location that gets at least six hours of sunlight each day.
Another idea for a wall garden is to build a small box. Then, simply sit your potted plants in the box and enjoy having fresh herbs right outside your door. Paint the box or add some cute designs to give it your own personal touch.
6. Scared to Start Big
If you’re a first-time gardener, the ideas of sowing seeds and companion planting may sound overwhelming. And that’s understandable. You don’t have to go big in the beginning. Just start with one herb at a time. Maybe choose that one herb you use the most in cooking, teas, etc…
Some Easy Herbs to Grow for Beginners
Not all herbs are easy to grow, especially in certain climates. Here’s a short list of the herbs I’ve found simple to cultivate:
- Basil
- Chives
- Dill
- Mints
- Rosemary
Growing Herbs from Cuttings
Some herbs are not so easy to grow from seeds. That’s why experts suggest propagating herbs instead.
What is propagating from a cutting? This is the process of using the cutting of a plant to grow more of that same variety. You can take cuttings from organically grown herbs purchased at the Farmer’s Market or grocery store. If you have a loved one or neighbor with a prolific plant, ask them for a cutting.
Here’s how I propagate basil and other herbs to extend my growing seasons:
Step 1: Select Cuttings
Make sure the pieces you choose to propagate are healthy. There’s no point in trying to grow from an unhealthy cutting.
Step 2: Remove Lower Leaves
Take off all the lower leaves. You can use these now, freeze them, dry them or whatever you choose. Just don’t throw them away.
Step 3: Suspend in Water
I’ve found that the easiest way to do this is by using water bottles. This allows you to use the upper portion of the bottle to trap the herbs so they don’t fall into the water. The goal is to get the cutting to grow roots.
Step 4: Wait for Roots
Sit the bottle on a windowsill where it can get indirect sunlight. Within a few days, you should start to see roots form.
Step 5: Plant the Cuttings
Now, it’s time to put your cuttings in some soil and grow more herbs. Plant them in your new herb garden or wherever you wish.
Recent Articles